


Welcome to Social Networking 101! In this series of lessons, we are going to teach you how to establish your presence in the vast world of social networking. Whether you are just starting out, or if you are a social networking maven, we hope to share some unique methods and tools that can save you time and give you a more visible web presence.
If you missed the first four lessons, you might want to go back and read them now.
Why Make A Google Profile?
Google makes our online experience better by making it easy for us to find stuff online, so why shouldn't it make it easier to find out more about ourselves, too? If you have ever Googled yourself, you may have been surprised at what you found. For instance, the first page of results displayed after Googling "Chuck Rogers" includes entries about a guy who builds guns, an auto dealer, a photographer, one of Will Rogers' grandsons, a Wikipedia entry about the guy who supposedly shot JFK from the grassy knoll (who knew?), ME, and a couple of other people. Strangely, former Detroit Lions receiver Charles "Chuck" Rogers has no presence on the first couple of search results pages. Why? Because he probably doesn't have a Google Profile.
According to an article in Time magazine, a team of social scientists published a study in 2008 that concluded "ego surfing" can partly be traced to a rise in narcissism, but (and more importantly for this lesson) it is also used by people to shape their personal brand.
Google created its profile service to help it do a better job of connecting the dots when it comes to all the stuff you do online. Building a Google profile page also allows you to provide some input on the type of information Google indexes about you. Finally, establishing a Google profile means your result will rank higher when people search for your name.
Protecting Your Personal Brand
Perhaps the best reason to create a Google profile (at least for our purposes) is to help establish and protect your personal or professional brand. Once you have created a profile, Google makes it easy to add links to web sites where you have established a presence. This goes back to lesson one, where we talked about establishing your brand. It all leads up to this: as you start exploring the various web sites and establishing a presence on them, you are going to need a place to store the links to all those profiles you are creating.
This is where having a Google profile really comes in handy. Not only does it provide a great place to keep track of all those social networking links, but in doing so you tell Google more about the sites on which you have profiles. This, in turn helps increase your ranking when someone searches for your name on Google.
Remember, a key component to establishing and protecting either your personal or professional brand is to get your name out there — register for everything you can under your chosen user name(s). Protecting your "brand," means you will accumulate a lot of site registrations, and most of these sites will allow you to create profiles. Why not store them somewhere that is easy for both you and others to find, AND helps increase your search ranking?
To get started, you are going to need one thing before anything else: a Gmail address. You don't have to use it for email if you don't want to (that's a subject for another article), but you do need one before you can establish a profile. If you don't have one already, go to the Gmail home page to sign up.
A Sample Profile Page - Mine
Let's take a look at a sample profile page. Not just any page, mind you. We are going to take a look at mine. Let's do this the way you would normally do it: by searching for it. So create a new page in your browser and type "Chuck Rogers" (WITH the quotes) into the search box. (If you use something other than Google, then go to http://www.google./com first.) Here's a link, so you can compare your search results with mine, if you want:
Once you cease to be amazed at how many people there are whose name is "Chuck Rogers," scroll all the way down to the bottom. The last search result on the page says "Profile results for Chuck Rogers." As of this writing, the first listing is someone who is a medical student in Chico, CA. That's OK - he only goes by "Chuck Rogers"whereas my profile is under "Charles Rogers," but I use "Chuck"as my nickname. My profile appears second. Go ahead and click it.
Here is what you should see:
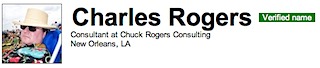
There it is in a nutshell: my picture, what I do, and where I live. But there is one other thing. That green box with white lettering that says "Verified name."
Verify Your Name
This is important. It means Google has verified the information in your profile was edited by you, and you alone. It does this in one of three ways: by calling a phone number you designate and having you enter a PIN that it gives you; by having you enter some credit card information, which it will verify with the institution that issued your card (no charges are made); or by verifying your Social Security number.
Other than verifying you are who you say you are, Google does not verify the information you enter. Verifying your name lets the viewer know that what you have written about yourself was written by you — not that it is accurate or truthful (that part is still up to you).
Here's what you need to do to verify your name:
Get a Gmail account if you don't have one already.
Go to Google's Knol site. If you aren't signed in already, click the "Sign In" link in the upper right corner and enter your gmail address and password.
Click the "Preferences" link in the upper right corner, then click the "Name Verification" tab.
Choose the verification method you prefer and follow the instructions.
It may seem strange that you have to go to Google's Knol site (their version of Wikipedia or Answers.com), but it happened that way out of necessity. Since information in the database is being presented as factual, sometimes it may be necessary to do some fact-checking. Especially when someone else disputes what has been written. So Google needed to make sure they had a way to contact the authors of the material being submitted to Knol. Once the verification process was created for Google Knol, it was easily implemented in profiles. (BTW, you don't have to contribute to Knol to verify your name, and it does not cost anything to go through the verification process.)
Verifying your name tells people who view your profile you are who you say you are, so make sure you do it.
Enter Your Information
Your personal information is entered in three areas: "About me," "Photos," and "Contact Info." You can choose how much to enter, and before you are finished you will be able to choose who is allowed to see some of the information. Let's take a look at each section:
About Me
Google asks for typical information such as name, nicknames, where you grew up, where you live now, and other places you lived. It also asks about the schools you attended, companies you have worked for, what you do. Entering where you grew up, where you live now, and other places you have lived puts markers on a Google map, which is embedded in your profile. (That's cool!)
You are then asked to enter a short bio. Make this something descriptive, that helps identify you as an individual. There are also some fun fields: "Something I can't find using Google," "My superpower," and "Interests." You don't have to fill these out. In fact, all of the fields are optional, so you can fill out as much or as little as you want. As far as I can tell, whether or not you fill in the fields doesn't (yet) affect your ranking when people search for your name.
Photos
Here is where you can enter your user name for Picasa or Flickr, or enter information about another photo service you use, and Google will automatically display photos from the album of your choosing. (I have my Flickr account, with recent photos chosen as the album). The photo stream will appear right below the header of your profile.
Contact Info
I put links to my web sites in the Short Bio part of the About Me section, making it as easy as possible for people to find me. But I also use the Contact Info section to for my email addresses, snail-mail addresses, phone numbers, and IM addresses. You can also indicate your birthday, as well as who is allowed to see the contact information on your profile. Finally, you can create a co-workers group — people who you probably don't mind having your work info (since you work with them) but who you may not want to have your home or mobile information.
Links - The Fun Part
Here is where things get interesting. If you have already viewed my profile, you may have noticed I have well over 100 links for sites I belong to. This is part of protecting my "brand." I may not actually use all these sites - some I will eventually get to, while others I may never use - but my personal or professional brand is protected on each. So should I choose to become more involved with one, my presence there will already be established, which means those who interact with me will have a more consistent experience doing so across different sites.
Here's how to enter links: Once you are done entering your personal information, make sure you are back on the "About Me" page and you will see "Add custom links to my profile" with two fields: for URL and Link name.
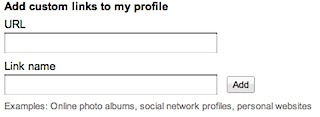
Notice the small type: "Examples: Online photo albums, social network profiles, personal websites." This is what you are going to use to keep track of all the web sites you belong to. The only thing you need to do is find the unique URL that will take visitors to your public profile page on any given site. This is because you don't want to send a viewer to the page on which you edit your profile. On some sites, this can be hard to find. Doing so is beyond the scope of this article, but I'll included it as I start taking you to different web sites as we continue our Social Networking experience in Social Networking 102: The Sites. (Coming Soon!)
Enter the public URL for your profile and provide a name for the link, then click the "Add" button. Do this for each site on which you have established a profile.
There are other sites you can use to help manage your profiles, and I will cover them in a future article. Even though I use some of them too, none have provided the simplicity of entering them in my Google profile. It is the one place I know where all of my profile links can be found.
Summary
In this lesson we covered how to use a Google profile to be the one repository people can visit to get the latest information on you, including all the sites on which you have profiles. Having all your site affiliations listed in one place helps you, helps those interested in you, and it helps Google help others find you.
Get a Google Gmail address (if you don't have one already)
Create a Google Profile
Verify your name through Google Knol
Enter links to your profiles for the sites you join in your profile.
Assignment: Perhaps not surprisingly, this lesson's assignment is to create your Google profile and start populating it with links for your profiles on the sites to which you already belong. Don't worry if you make a mistake, as everything can be edited later.
This concludes Social Networking 101: Establishing Your Brand and gives you all the tools you need to create a strong personal and professional presence on all those social networking sites out there.
Next up, in Social Networking 102: The Sites we will start exploring those sites, starting with the 800 lb. gorilla of social networking: Facebook.